Showing posts with label Fabric Arts. Show all posts

Saturday, May 2, 2015

Quilt Backs You'll Flip Over

The smell of new fabrics is among my earliest memories stemming from frequent visits to the local fabric shop.  Not many of my memories involve smells but in this case, I was nose-level with the bottom of all those bolts and while my mother was using her sense of sight,  my sense of smell was getting a work out. 

The shop owner greeted us by name as we entered the door and she and my mother talked sewing.   No wonder I still remember the place.  It was a place of comfort and friendship amidst beautiful fabric patterns, colors and textures. 

In later years my older sister and I would walk the short distance to the shop for a time of inspirational summer fun.   We could look at pattern books for hours....at least Linda could and it seemed like hours to me.  The only thing that could pull Linda away from dreaming over the books was hunger and then candy was the answer.

Chocolate!

"Pedal Pushers" were my first solo project.  I was twelve.  After my successful sewing experience I learned not only could I sew, I could sew fast.  I could complete a project in much less time than my mother could do the same project!
She was so easily distracted....meals, children,  PTA meetings, cleaning, coffee..... She was so slow getting my things done.
 
I sewed! 
And sewed!
And sewed!
Until it became drudgery
It was another job...and after all.... I had cooking and cleaning, and meals to make and meeting at school and a never ending job of  maintaining a home... and washing....I had kids! 

I stopped sewing!
 
Only recently did I retire from teaching.  Now every day is like a vacation day, spent in some form of creative work whether it be at my drafting table, sewing machine or in my garden.  Every day is a good day for me. 
 
All the women in my family quilted but I resisted it….never wanted to do it.  I ignored it as best I could….had a healthy respect for quilters from a distance but finally, it caught up with me.  Now, I am a quilting fanatic.  What can I say?  I never stood a chance!

Now, I love it all.
I sew every day!
Every day that I sew is a good day!
And I have begun to quilt!
Quilting had became a passion.
 
 So for all of you ladies out there who, like me, love the art of sewing, quilting and creating here is a FREEBIE download to help with making quilt backs you'll flip over.

Click here to Download.
   
One of the obstacles I ran into as a new quilter was making a quilt back that was pretty. 
 But luckily, as I mentioned, I had people who quilted I could lean on. 
So I leaned on my sister for a little more help and she showed me the basics to quilt backing...in fact, she is my go-to person for all my quilting questions. 
With her guidance and my background in art I began to think of the backs of my quilt like the continuation of the story.

The back should be simple yet compliment the front. 
Backs You'll Flip Over, is a simple 5 page guide which applies the rule of Thirds (a concept from my art background) to design a quilt back using you scrap fabrics, reject blocks and pieced fabrics. 
Download here.

Trust me, it is free.  No obligations. 
I would love to see you beautiful backs. 

Happy Quilting!
Darla


Thursday, April 23, 2015

Everything I Learned About Letters I Learned in Junior High

Who would guess I would learn something in a junior high, one semester art class that would last me a life time and  be used continually.  Thank you, Miss Burks. 

Miss Burks was a soft spoken art teacher in the junior high I attended.  Although Miss Burks was in my life only for a short period of time she gave me confidence and skills that have endured all of my crazy life.  She was a quiet woman, never married and had the responsibility of taking care of her aging mother who lived with her.  As far as I knew back then Miss Burks was fairly old herself.

Looking back, all my teachers seemed old to me but I was young and everyone older than me was old.  Now as an old woman myself I wonder just how old she really was. 

All of Miss Burks students entered a poster contest of some kind.  The poster was to be completed on a half sheet of black poster board with an image and title painted on with....of course, poster paint.  Now when I smell poster paint it takes me back to my time in Miss Burks junior high art class. Although, now poster paint is not my medium of choice, it is cheap and probably worked well with her school budget.

Her method of making the letters was so simple  everyone learned to make pretty letters.  Not everyone was able to stay in the lines when they painted them but they started off looking great. 
I have taken this skill for granted until my daughter said, "You never taught me that."


Although in Miss Burks class we drew the letters and painted them now I use the same concept and cut my letters in fabric which I use to customize quilts, purses, and other fabric projects. 


The concept is simple.  Most letters are symmetrical therefore can be easily cut from a small folded rectangle.   "A" as on the left is horizontally symmetrical while "O" on the right is symmetrical both directions horizontal or vertically. Most letters fall into one or the other category. 


The asymmetrical letters are the most challenging but even those letters are easy when you apply the simple concepts I learned in a junior high class. 


So I wrote up the instructions and made a PDF for anyone to download and keep.

To download the PDF go here.  It is free.  No obligation to buy anything....it is just free for anyone. 


Once you learn the concept of a simple letter you can easily customize the letters and get as fancy as you want.  It is so easy even the children can do it. 


 Customizing quilts is fun and easy. 
I use fabric stabilized with a fusible interfacing.  Instructions in PDF.
Here are two of my quilts made for grandchildren.  Patterns for these quilts are available in my Craftsy store.(Link on right.)


Thursday, November 13, 2014

The Christmas Squirrel Quilt Pattern

It has been two years but finally I have completed the pattern for the Squirrels' Christmas Quilt I made two years ago.

This is the quilt I entered in the Think Christmas Blog Hop in 2012. (click to go the post)

This was my first paper piecing quilt and in fact, my first real quilt! And I had never done any type of paper piecing.

I started the quilt during the time I  had three grandchildren living with me along with their parents while their house was under construction.

Well...construction?  It was 18 months, I think it was in the planning stage,the financing stage, the finding the right people stage and finally the construction stage.

Needless to say space was cramped, it was hard to find a private space for my creative things or even the non-creative things and every time I took out something fun to do the grandchildren wanted to take part in it.  Now, don't misunderstand.  I loved it!  I thrived on it! I just didn't get much done.

But that is all fine.  It was bonding times. The children and I grew together during our "projects" time.

When the kids and their parents went on vacation for a few days I was left alone...well, almost...my daughter came with her children to spend the weekend and when we finally had time to sit down and read the direction together a storm moved in, a flash a lightning lit up the sky with a booming noise and the lights were out...for hours.

Then my old machine gave out on me and I was forced to buy a new one!  Poor me!  I got the best machine I could afford.  

Now not only was I learning how to paper piece I was learning how to use a new machine...my first computerized machine.  My last machine was a Viking from about "79.  It lasted a good long time!

Next Squirrels' Christmas Pillows!
I wonder if I will get it done before two years pass.

The Squirrel's Christmas Quilt Pattern can be found either my Etsy site or my Craftsy site.
post signature


Friday, September 5, 2014

Sweet Dreams

I have not been blogging lately and it is because I have been busy.  I know...who hasn't been?  It is the way of the world today, isn't it?  Why can't we just slow down and enjoy the simple pleasures of our lives.  Well, that is another story!

Not only am I working to get an online business going (Etsy and Craftsy), and keeping grandchildren as much as possible because they are so stinkin' cute but we are remodeling.

Remodeling!
Anyone who has ever built a house or remodeled a house knows, you have a full plate of things that have to be done NOW!

The remodeling is a blog coming up soon, as is that reupholstering job I started in June so stay tuned as the old show hostesses on late night TV would say.  

On my table today I have buntings for a baby shower.
Last Sunday night or Monday morning actually in the wee hours that are only kept by mothers nursing babies or expectant mothers doing their nesting I had a question from an Etsy custom order presented to me which gave my creativity a real adrenalin shot.  An expectant mother is decorating her new nursery for a little girl (actually due today) in gray, pink and white and wanted to information on picking buntings to coordinate.  

It did not take me long to get onto this new color scheme and I had buntings adapted to the color scheme she wanted and made some little birds and hearts to be ribbon holders and my week was gone! I was making birds and hearts and printing buntings all week and having a great time doing it.  I love retirement!   


Linda, my sister needed a baby shower gift which has to be mailed  and needs to arrive before next Friday. So Linda and I kicked it into high gear and off we go.

I made the buntings and Linda made the cute little owls.  I loved her owls with their big bulgy eyes.  I was planning on designing some myself but I don't think they would have been as cute.  I learn a lot from my sister.

We envision this hanging above the baby's crib.  Since the baby's name is not not yet decided Linda decided to say "Sweet Dreams".   So cute!

Job completed and mailed for their destination!
Sweet Dreams little one!

(Here is my disclaimer.  Photos continue to kick my rear.  I had a hard time adjusting colors on the photo.  The buntings are white, with gray and pink details.  The owls are varying values of pink and gray.  All on a darker gray cloth laid out on my table.  I don't have a baby's crib.  Not anymore.  But wouldn't that be nice?)


Bunting are available through my Etsy shop.  See Buntings and Banners section.  


Sunday, July 27, 2014

Project Upholster the Settee: Burlap and Edgeroll

It has been a busy week and I have found very little time to work on the upholstering but here is the little bit of work I did get done.

First off, I took a paper pattern of the seat backs to my Upholstery supplier to get the foam cut to size.  At no extra charge to me they cut the foam according to my pattern.  I had to go back the following day and pick them up the. Had I known what to do in the beginning I could have saved myself a trip or two and would have been ahead of the game since I now have used up two additional days getting the foam I could have used for installing it.

I also, picked up more supplies I needed.

  • Five yards of burlap to cover the springs and 
  • 3/4" edge roll to place along the front of the springs. This will help give a nice rolled edge in the completed cushion.
  • Spray adhesive to attach the fabric to the foam and to attach the foam on the burlap.  
The burlap is to cover over the springs and is placed over t the springs and stapled all around.  Start in the center back, go to the center front and then stretch the burlap to make a neat covering of the springs. 

Oops!!If you will recall I am a newbie at this so I make mistakes. 
the flat head screwdriver is on the seat so I can pull out staples not installed correctly.  

Oops!  Another mistake I made was putting the foam on the springs and putting the burlap over the foam.  I was nearly finished before I realized my mistake!  Ugh!  More time wasted!

Edge roll comes in different sizes.  I used 3/4 inch.  I stapled it in the front and along both sides but the sides are not necessary and I ended up taking it off the sides because I could not get the stapler lined up to staple the edge roll in place.  I hope I don't regret it later.  


I did have some helpers as you can see.  I set the foam on the seat, set the little ones on the seat and took out my phone to snap a picture.   As soon as I took out the phone the kids took on a pose!
The foam is just sitting in place and not actually where it is going in the seat back.

Next: Foam Fun

post signature


Monday, July 21, 2014

Project Upholster the Settee


Some years ago....ten to be exact, I bought a settee. It is a three piece set, a love seat, a Papa chair (with arms)  and  a Mama chair (no arms).  And I purchased it just as you see it here, no seats, no springs, just bare bones.

Now, if I have said it before, you will recall I was raised to believe I could do anything...as long as I have the instructions.  Well, as years go by I think I need to add and have the muscles necessary or know where to find someone with them.

So here goes!  I am on a mission to get it done!  Project Upholster the Settee has begun.


After a little rub with some denatured alcohol I was ready to begin.

Step One:  Sinuous springs hooks.  I thought this was going to be the easy part.  The old wood was like concrete.  But after drilling pilot holes with a tiny drill bit I could screw in the hooks.

Step Two:  Sinuous springs.  I did not EVEN act like I could cut these springs.  I got Mr. Lee to help me with this but once cut to the correct size no problems.


Step Three:  Tie the sinuous springs together.  Oh, easy!  At least, once you got the holes drilled to screw the screws into the side.


So here it is Project Upholster the Settee is underway.
Next we drew out templates of the window panels on the back of the seats and bottom seat cushion to have the foam cut to size.

Off to the upholstery shop to buy more stuff:  Foam, edge rolls, and some roll batting.
I am a newbie at this so I am approaching it gingerly.  I buy what I need for the part I am doing.  It is so overwhelming in the beginning.  But taking it in steps I know I can do this!  Stay tuned!
post signature

Tuesday, February 19, 2013

I'm a Little ARTrageous!


 It's all about me! 
And I am feeling a little ARTrageous!
ARTrageous Bag: Front view flap
Being that I am really more of an artist than a quilter, ARTrageous is more about me.
And as I get older, I load on more and more jewelry and love more ARTrageous prints (especially animal skins) and outfits.  And of course, just being an artist means I must be a little....well....weird!

So I adapted the Amy Bradley's patten image to be more about me.  And since I love to make bags and purses, I decided to do one more bag for the blog.
It is going to be so good when I get it done....but...
time is spinning on and my project is not quite finished....so I am rushing...and rushing...and of course, when you rush that is when things start to happen! 

It was going so well until...
the thread on my machine broke....

Side view
and I could not rethread it.....and I tried....and tried...and tried again...I even took the needle out and tried to thread it in better light and then tried to put it back on the machine....but, well, no...then I decided it was the old needle and tried a new...one more time...and it threaded easily. 

Okay, back on track, sewing smoothly, evenly, and without a hitch.....
but oh, no, the bobbin ran out! 

As the evening wore on, it became dark and a hunger husband arrived.... I needed to take a little break to prepare supper.  But not before quickly finishing up the purse lining and then I can sit down and finish up. 
Back view: pockets, pockets, pockets.
But no!  the lining was backwards so I put the water on to boil for supper and starting ripping out lining stitches....but when I was inches from finishing ripping out I realized ....I was wrong ....and had done it right!


Magazine pocket under front flap.

So that's it for me! 
A special thanks to Amy Bradley for her inspirational pattern.
and a special thanks to Madame Samm for her motivational blog hops. 
and another special thanks goes to Marlene for being our cheerful leader! 
As usual, it has been fun!

Several of you have asked about what pattern I used for this purse so I am adding this to the post.  
The design is mine.  I made it up as I went along.  Every time I see a purse, I look at it and add it to my memory of good ideas to do and I love pockets and divisions in purses and am always looking for ways to make them easily.  Seldom will I actually buy a pattern.   I just wing it.  So I make mistakes and have to correct and redo but it is all fun to me.  At some point I might try to write up patterns but this is one of a kind at this posting.  I appreciate all of the sweet comments I have gotten and inquiries about the pattern.  You have made my day!! 
Detail of pattern design 

Buzzing and Bumbling

Wednesday, January 23, 2013

And the Winner Is....


It is always so much fun to have a giveaway and a surprise one at that! 
 
IOh, but I made two bags to give away and have two Chlorox pens instead of one!   And today....January 24th 
 is our
In Your Words Blog Hop
cheerleader
Linda's birthday
 so not only will I have a bag and a Chlorox pen for one of you but also, one for Linda. 
 
Happy Birthday, Linda! 
And a special thank you for being my wings!
 
I hope you will enjoy the bag as much as I enjoyed making it for you. 
 
So...
DRUMROLL
..................
 
MoeWest (Maureen)
 is the winner of my
In Your Words 
giveaway. 
 
 
Be sure to contact me and tell me where I can send it. 
 
Thanks for a fun time. 

The bag has a squared bottom, zebra print medium weight fabric on the outside, lined with lime green chevon print and same contrast border, have grommets with cording roped through to make cinching the bag easy.  Measurement are approximately  9" x  14" x 5"....not a backpack but a fun sturdy bag for whatever your need. 

Next post: Instructions for making this bag
Sorry, guys.  I just ran out of time today.


Tuesday, January 8, 2013

In Your Words: My Little Gems' Gym Bags/Designing with Bleach

The thread was flying,
the needle bobbing,
and last minute preparations for the day's blog hop were keeping me in a stir all week and into the night! 
In fact, I was in such a rush I even threaded my machine needle with my bobbin thread! 
Now that is a new one on me!!
And believe me I have done some doozies in the past! 
Just last week shopping in Costco with Linda (yes, Linda who is our blog hop leader and my sister) I walked off with the wrong shopping cart! 
It went unnoticed until Linda wanted to know where her Nutella was and... where were my HDMI cables?
Trust me... life's a trip!
Never a dull moment. 

It is all worth it to be able to share my little gems' gym bags!
My little gems are my eleven grandchildren.  (That makes me sound so old!)
This Valentine's day they will be receiving their own personalized gym bag
with a few little surprises inside....
nine bags completed!  Two more to go.

So my contribution to our blog hop today are the little gym bags with some fun words
bleached and embellished.
Designing with Clorox Pen and fabric marker!


Here are the guidelines for this project:
  1. Do a time bleach test on a sample of your fabric to decide how long to leave the bleach.  I cut several 1" squares and squeezed a little bleach on each and rinsed one at a time in 10 minute intervals. 
  2. For the bag cut two panels 15"(or 14) x 18" (I got four bags from one yard of 60" wide cotton duck)
  3. Press each section onto the waxy side of freezer paper to stabilize during bleaching.
  4. Design the fabric with the Clorox pen using the narrow tip side. Squeeze gently and evenly, moving as smoothly as possibly.   
  5. Watch the clock and rinse at the appropriate time previously decided in the bleach test. Gently remove from the freezer paper.
  6. Add baking soda liberally to the wash tub of cool rinse water or you can sprinkle baking soda directly onto the bleached area and then rinse.
  7.  Rinse in cool water until all the bleach is removed.
  8. Lay the fabric on an old towel. Roll the fabric into it and gently squeeze.  Open it up, remove the panel from the towel. Lay flat to dry. 
  9. Once dry.  Go back into the design using a Fabric Sharpie marker and embellish with more details.  The fun continues!
  10. NOTE:  Pictured below, way below, are the Clorox types I used.  I used the Pen type to draw and then used the gel (toilet bowl cleaner) in a bowl for stamping the bleach.  The gel is more liquified and thus runs outside of the lines more.  But for those of you who do not have the Clorox pens you MIGHT try the gel in a bottle with a NARROW opening like a glue bottle. Be resourceful and let me know how it works.   I have not tried this myself but now I will have to!
The Gem Bag Construction
      • Press down  1" on top edge of both pieces.
      • Clean finish the top edges on both pieces (zig-zag or stitch a narrow edge)
      • On sides about 2" down (where the casing will be open for the drawstrings) clean finish the edges.
      • Stitch along the top, leaving the ends open.
    • Sides and Bottom of bag
      • Stitch sides starting at top stitching leaving casings open on the sides. 
      • Stitch bottom and opposite side ending at stitching for casing.
      • At bottom corners stitch diagonally creating a triangle 2" in both directions from the corner.  This will be for serve to lessen stress on grommets.
    • Grommets
      • 1/4" grommets are attached using manufacturer's directions.  Place in bottom corners inside of triangles.
    • Drawstings
      • 1/4" cording ( I found 1/4" clothesline rope in white at my local grocery store which is economical, attractive and sturdy. 100' for about $2)
      • Cut two sections each about 2 yards long.  (Total 4 yards per bag.)
      • Run the first cord through both casing returning to its starting place.  Pull cord ends down to the grommet and run both ends through the grommet and knot ends together to keep them secure. 
      • Second cord will start on the opposite side as the first cord, run through both casing and returning to where it started. Pull cord down to grommet and secure
        with a knot. (The first cord starts and ends on one side.  The second cord starts and ends on the opposite side.  To close the bag pull the cords on both sides at the same time. )
       

Thank you, Madame Samm and Linda!  What a great idea! 

This has been a fun experience! 

Oh, I almost forgot! 
Leave a comment so I will have a record of your visit and enter you in my...

SURPRISE GIVEAWAY! 

The Winner will be announced on Jan. 24th!

Now, don't forget! 
Be sure to drop in on all the other participating blogs for today. 
Wednesday, January 9
Kathy's Quilts (Kathy W.)
Sunshine Quilting (Martina S.)
Doodling in My Mind (YOU ARE HERE  Darla)
Grammie Q's (Charlotte M.)
Dancing Moon (Carla B.)

Sing Out Loud...Swing High....Watch Ants Crawl..
Find the Artist who's inside of you!
See you in the blogs!
Darla

Wednesday, January 2, 2013

Sneak Peek for In Your Words

In Your Word Blog Hop
Jan 7th-16th
 
Oh, I need to get to work! 
That blog hop I signed up to do is just next week! 
And here I am putting together jigsaw puzzles and watching old movies on TMC,  leisurely taking down the Christmas decor and keeping warm while enjoying my time off! 
Which by the way, I'm not ashamed of not being more productive but it is time for me to start putting my mind to some more creative endeavors.
 
In Your Words is the blog hop that has me hopping right now!
I am anxious to see what the other bloggers have in their minds. There are so many new things on the market and I expect to be seeing some fun ideas, to be impressed, to be inspired and motivated to action.   
 
And not a minute too soon for me!
 
You may think the hard part is coming up with the technique but instead for me the hard part has been in coming up with just the perfect words! 
 
Do I want to be funny?
...or inspire goodness?
...or state the obvious?
...or do a play on words?
 
What words do I use?   
 
And then there is this personal drive to do something that is new to me! 
For this project I want to do something I have NEVER done. 
I have considered a number of things and when I think I have a good idea I find someone else has already done it and sometimes, even marketed it. 
 
I have written it, and sewn it, and glued it, and waxed it and even pixelated it! 
But how do I want to do it this time?
 
Well, here is my sneak peek! 
Bleach! 
 
But bleach what?
 
I'm not telling...not yet! 
But I will drop a hint or two!
A child will like it...or even a teen...
and you will have all the information to complete the project yourself
without even buying a pattern. 
And
there will be tips to set you up for successs
and a giveaway
and  all you will need to do is
drop me a line in the comment section next Wednesday
and your name will be added to the drawing
which will take place on the 24th which is Linda's birthday. 
 
So until then enjoy the first week of a new year!
post signature


Thursday, November 29, 2012

New life for an old book


Oh, it is nearly Christmas again and that means Christmas projects!  Linda and I always spent our evenings after school and weekends making ornaments and doing projects related to Christmas.  I still think the best projects happen in December and the time leading up to Christmas.

One of my fond memories is making an angel in the garage out of my dad's old Popular Mechanics magazines.  After all, what good were they? They were just filled with not so pretty pictures and had lots and lots of writing.  He had stacks of them in the garage so Linda and I just helped ourselves to his magazines and started folding.

When we brought out the beautiful angel Daddy did ask what magazines we used and he did have a strange look on his face when we told but I never heard any complaint!

I guess, we were really cute back then!  I wonder if I could get away with that today?
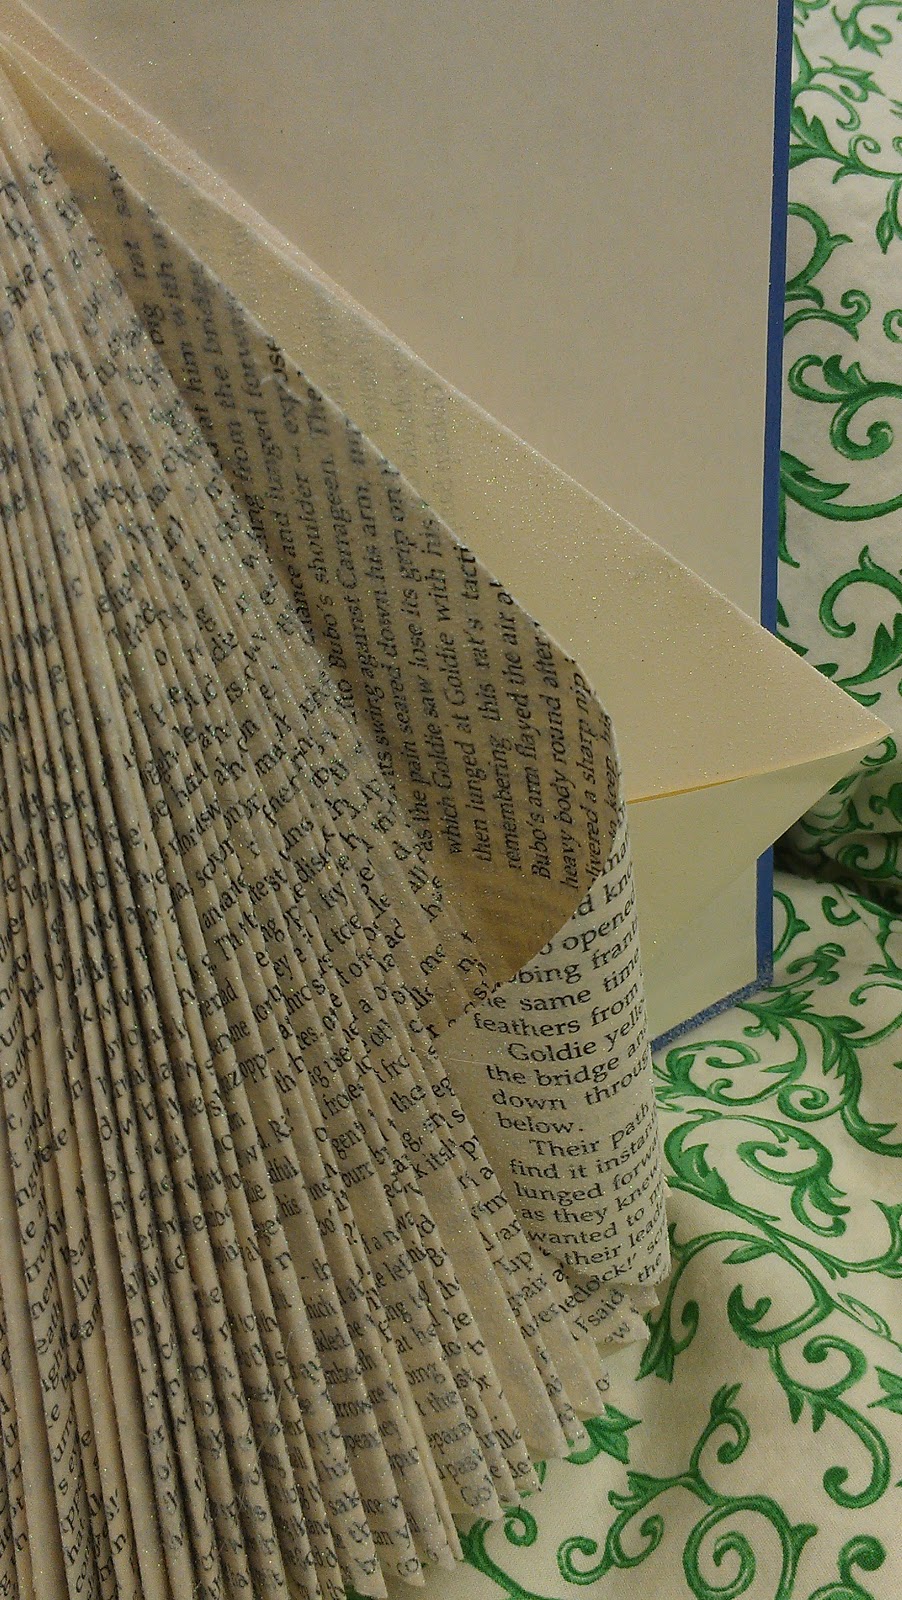
This week I requested magazines from our school librarian for my art classes. She supplied me the magazines as requested and threw in some old books as well.   As soon as they fell into my hands the old folding memories resurfaced.  I had kids folding pages in minutes.  As I folded I let the book tell me what it wanted to be.  This book wanted to be an angel but we had many various Christmas trees using the same concept.  

The How-to:

(I started with an old book with yellowed pages and thicker paper with 200 pages.)

The Folded Page:

  • Each individual page has three folds: 
    • 1st: Top right corner to inside seam.   
    • 2nd fold: Folded edge of page to inside seam. 
    • 3rd.  Turn up triangle that hangs off the bottom.   
  • Next page: same as above until all pages are folded.

Sleeves and Wings:

  • Pull out pages where you think the arms should be.
  • Unfold page leaving only the first fold.
  •  Tuck tip of page into one of the pages in front of it to create a curved sleeve.several pages in front of it.
  • The hard cover and the fly page folded in serve as wings.

Head...Still re-purposing!

  • Wad up a plastic grocery bag into a ball  and place into another bag making it as round and smooth as you can.  
  • Cut a large circle out of an old white tee-shirt and cover the plastic ball with it stretching it tightly.
  • Hold fabric with a rubber band.  
  • Tape around rubber band and a little of the bag below the rubber band.   
  • Insert taped end into the gap made by the book binding.   

Scarf....oh, so easy and so cute!  

  • Sandwich a 6-8" square of that old tee-shirt fabric between two pieces of paper.  
  • Draw a circle about 4-6" or improvise and wing it and just cut the circle cutting through both papers and fabric. 
  •  Continue cutting in a spiral folding the edge of the circle about 1/2"-3/4" away from previously cut edge until you come to the middle.  Cut a tiny circle out of the middle and discard.  
  • Take an end in each hand and stretch fabric.  
  • It will twist and spiral downward.  
  • Wrap around neck letting spirals of scarf cascade downward.  Hot glue in place. 

Spray Glitter:  NOT re-purposing but oh, so nice!

I purchased spray glitter in the craft section of Walmart.  I used silver Glitter Blast.
Spray the entire angel including head and scarf.

Add halo using a length of wired ribbon about 6-8" long depending on head size.

I'm having so much fun!  
Can't wait until tomorrow so I can do more fun stuff!


post signature