Friday, April 29, 2011

Strictly Saturday: Chocolate Almond Biscotti for Mother's Day

With Mother's Day coming up we want to be sure to have something that has both a little sophistication and lot of charm.  

Biscotti is a popular pastry with our young and older coffee or tea drinking crowds so that just might include your mother, sister, daughter or some special woman in your life. 

Originating in Italy, biscotti came from the Italian word biscotto which means twice baked because these little cakes are baked twice to make them dry which can be stored longer.  

My favorite biscotti is chocolate almond.  

These are as all biscotti I have ever eaten....dry and not terrible sweet.  If that does not appeal to you maybe you would prefer the Brownie Layer Torte for Mother's Day.

To make Biscotti mix together

  • 1 cup white sugar
  • 1/4 cup butter, softened
  • 1/4 cup olive oil
Add
  • 1 teaspoon almond extract
  • 3 eggs
Sift together before adding to above mixture:
  • 2 1/4 cups all-purpose flour
  • 1 1/4 cups unsweetened cocoa powder
  • 2 teaspoons baking powder
Add:
  • 1 (5 ounce) milk chocolate candy bar, chopped 
Optional:
1/2  cup chopped almonds
Preheat oven to 350 degrees F. Grease cookie sheets.
In a large bowl, cream together the sugar, butter and olive oil until smooth. Stir in the almond extract and eggs. Combine the flour, cocoa, and baking powder. Stir into the creamed mixture. Fold in the chocolate pieces. Cover, and chill dough for 10 minutes.

Divide the dough into two equal pieces. Roll each piece into a log about 9 inches long. Place the logs onto the prepared cookie sheets about 4 inches apart. Flatten each one down to 1 inch thickness.
Roll dough in chopped almonds if desired.  
 Bake in the preheated oven for 20 to 25 minutes, or until firm. 
Cool on sheets for 15 minutes before removing to wire racks to cool completely. 
Move the cookie loaves to a cutting board. Using a serrated knife, slice each loaf crosswise into 3/4 inch slices. Return slices to the baking sheet cut side down and bake for an additional 8 to 10 minutes on each side, until dry and lightly toasted. Cool completely before storing in an airtight container. 

*Drizzle with melted chocolate chips, almond bark or Wilton's candy melts. 
Be creative.  
You can use sprinkles if you want.
 
post signature

A Painting A Day: Waterlily

Waterlily (Watercolor 7" x 11")
Today was a much better day.  

It was relaxing to sit and paint today.  My students were still testing but only the sophomores and juniors leaving the freshman in regular classes and seniors were given time off until after lunch.  Since my classes are all mixed I had an easy morning with just a few students.  Even so I decided something less challenging today may be necessary after yesterday's fiasco so I found a photo of one of last summer's waterlilies from my pond.


Photo of White Waterlily
It was a photo of one of the
white waterlilies but I wanted more color. Originally the photo of the waterlily was pretty washed out looking and not very interesting in my opinion (see insert to right).

Changing colors in a photo can be challenging and sometimes it looks unnatural in a painting.  In order to maintain some naturalness to the enhancement of color I manipulated the photo on my computer using software for photos. I boosted the warm colors and increased the contrast before printing out the photo. 
 

I loved the warm colors reflecting off the center of the waterlily and the reflected lights under the petals.  I could add in more detail if I decided to do so but at the end of my school day I called it finished, packed up my supplies and put the painting away as my last class entered the room.

It pleased me when one of my students asked what I had painted today and wanted to see it.  

They noticed!
post signature

A Painting A Day: Good Idea Gone Astray

You know how sometimes you know you should have stayed in bed....well, yesterday was that day for me.  

It started with not knowing whether or not I took my medication so I did not take it in case I had already taken it.  

Then it was a state testing day at school and I had a good group of juniors but the day was dragging on and getting long and they become restless and I got tired.  

Then the afternoon classes were cut short so no work could really take place since the set up and clean up time occupied about 50% of the class. 

Going home was fine but I just did not feel "right" (probably I did not take my meds!).

Then I sat down to paint. I had a couple of interruptions and then got right back to the painting before I noticed I had painted the background right on top of where the top part of a girl belonged and since her feet and the bottom of her skirt were already painting I had to work in her upper body.

But alas, the composition looked crowded so I painted out two, maybe three women who were creating too much ambiguity.  
 
So I turned my watercolor into a mixed media....by the time I got tired of working with it I had applied all sorts of things to work out the composition. 
 It was turning out to be a terrible, horrible, no-good, very bad day!
I think I will move to Australia.

When Lee turned out the lights on me while I sat working, I just called it a day.
But proof of my attempt...and this is not going in my portfolio....
My Fiasco!
post signature

Organization for the Busy Lady

Organizing Jewelry!
Sunday morning I was going through my necklaces that were all hanging from my towel hook next to my mirror in the bathroom, searching for a particular necklace and having to untangle it from the others that have attached themselves....a very frustrating time all the while thinking if I would just hang them individually it would be so easy.  

J-Hook Push Pins
It all started so innocently.  I am one of the buyers for my son's frame shop and because I am buying jewelry for the shop; I am buying jewelry for myself.  Over the period of time we have had jewelry in the shop I have accumulated a good many pieces of jewelry.  Storing the jewelry became a problem when the sheer number of pieces became more than was my jewelry organizers, boxes, etc would hold.   When I had Lee install a decorative towel hook next to my bathroom mirror for my hand towel I hung a necklace there as I took it off.  The next night I did the same thing and before long I had a dozen necklaces (or more) hanging on the towel hook, crowding out the towel long ago and piling one necklace over the other making it hard to get to the bottom necklace.  Plus there were necklaces downstairs on the table, next to the phone, in the studio next to my painting, next to the laptop on the table....you understand....I have a good many pieces and organization had no true meaning when it comes to jewelry. I had pieces I had forgotten I owned. 

I thought I would purchase a piece of plywood, cover it, frame it and put decorative hooks on it and hang the frame behind the door.  
Great idea!  
Never got done!
I got as far as buying the plywood which turned out to be a great purchase.  I use it daily with my Painting a Day challenge as the board to which I stretch my watercolor paintings.  

Recently at the grocery store I was on a mission to purchase push pins for my students when I found J-Hook push pins that looked interesting to me and I threw them in my basket. 
They are cheap-cheap-cheap.  
Just a little nail inserted into a button of plastic that has a plastic hook hanging on it.  
In five minutes I lined up the push pins on my wall behind the closet door and hung my necklaces on them.  
Behind my closet door inside my closet
The push pins come 40 to a box and I need to buy a new box to hang the rest of my jewelry.
Let's see....what shall I wear today? 

post signature

Wednesday, April 27, 2011

A Painting A Day: Snips and Snails and Puppy Dog Tails

What are little boys made of?
Snips and Snails and Puppy Dog Tails, 
That's what little boys are made of.

My grandson was quietly entertaining himself under the tree, 
snapping twigs in half and making a small pile at his feet when I noticed him. 
No telling how long he had been at work there with the twigs and 
no telling how much longer he could entertain himself if no one had interrupted him.  
Just being a little boy!
Snips and Snails and Puppy Dog Tails... (watercolor 8" x 10")
Really a rush job, needs tweaking still but this is what I got done today.
post signature

Tuesday, April 26, 2011

A Painting A Day: River Rentals

When I go anywhere I usually have a camera on my shoulder.  My family has gotten used to my unusual taste in photography.  They humor me.

Being an art teacher I am always looking for a new idea for an artwork and usually come back with something my students and I can use.  Often a couple of my students have tried their hand at one of my photos and I never give it a second thought after that.

For the fourth of July a couple of years back we took a day trip to the Guadalupe  River at a privately owned camp.  It is not unusual for people to float the river and rentals are usually available on the river.  
Canoes, rafts, kayaks, tubes....whatever you can think of you could probably find it for rent somewhere.
I was more interested in the patterns of shapes and colors created by the canoes in storage around the side of the camp store than actually renting anything.
  Next time, I think I will take my paints with me and paint at the river.

River Rental is a watercolor about 9" x 12".

post signature

Monday, April 25, 2011

A Painting A Day: Fiesta

Fiesta,  watercolor 9" x 12".


Too tired to write.


post signature

Easter Day


Our Easter celebration was a great family time! 
There were about 45 family and friends gathered at our home in the country...
in and out of the house... 
upstairs and downstairs....
in the swings, on the trampoline, relaxing in lawn chairs, 
drinking coffee or tea or pink lemonade, 
eating cakes and candies and everything else, 
making hats out of foam plates and stick-on shapes, 
drawing on the sidewalk with chalk 
and blowing bubbles
and getting wagon rides!  
A great loving good time! 

post signature

Saturday, April 23, 2011

A Painting A Day: Folklorica

Correct me if I am wrong but Folklorica is Mexican folk dancing. 
I wrongly called my last piece Flamenco and technically it is Folklorica.   
I am thankful to Gabriela, my daughter-in-law for helping me to learn more about the Mexican culture.

In the midst of Easter preparations I squeezed in this little painting between smoking the brisket and cleaning the kitchen. 
I like painting much better than the cleaning.
Happy Easter.
 
post signature

Friday, April 22, 2011

A Painting A Day: Feeding the Cows

Unfinished (Feeding the Cows Watercolor 8" x 10")
It has been a busy day but I did get a painting started.  

Feeding the Cows is a small watercolor.  It is a painting of my son and his son sitting on top of a round hay bale with a cow below them eating the hay.  My grandson was not to sure about the situation and was a little scared.  I can remember being scared of cows myself when I was young.  If I were ever to touch a cow or even a calf I had to be held by one of my parents.  If they were not holding me I kept my distance.  

You can not see the face of the cow and I can not "make it up".  I have seen cows all my life but while I am painting the face on a cow eating escapes me.  

At some point I accidentally picked up a large amount of Ultramarine blue while working on my son's face and before I noticed the blue it was right in the middle of his face.  

I screamed!

Then I wet it and wiped it and got most of it off but lost a little of the detail in his face.  
So despite the challenges I have had today I got most of a painting done. 

I am still working on it.   
No area is complete yet. 

post signature

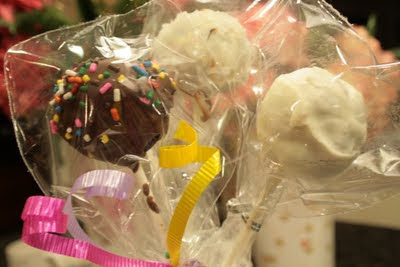
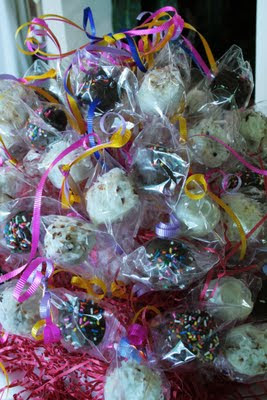
Strictly Saturday: Cake Pops

With so many children coming to my house this coming Sunday I decided Cake Pops would be a fun treat to make.  I have never made them before but they look so cute I decided I had to try my hand at it.  If you have never heard of cake pops they are like a candy on a stick but cake.  

I spent most of my afternoon making them but I made about 70 of them.  I have two different kinds.  I used a chocolate cake mix for some of them and Linda had Italian Cream Cake she had made from scratch she gave me to use that was in her freezer.  


Cake Pops are not hard to make but I did make a mess in the kitchen.  Anytime I use chocolate to dip things I make a mess.  But it was worth it.  I have learned to break my work up into steps and clean as I go so it is not an overwhelming job.  

There are several steps to making Cake Pops. 


You will need:
  • Cake: Most cakes will work.  Cake mixes are fine.
  • Canned frosting any flavor
  • Lollipop sticks (I used Wilton's)
  • 1 lb - 1 1/2 lbs Melting Chocolate: Almond Bark, Dipping Chocolate, Wilton's Candy Melts in flavor you desire
  • Sprinkles
  • Styrofoam to hold Cake Pops while hardening 
  •  Optional: Plastic Party Bags (Wilton's purchased at Walmart in Craft/Cake Decorating Section)
  • Optional but recommended: Wilton Chocolate Melter (makes life easier...it keeps the candy melted so you can dip the cake pops.  Purchased at Walmart in Craft/Cake Decorating section.)
  • Optional but recommended: Cookie scoop (Mine is Pampered Chef)
Step 2
Step 3
Step 5
Step 6


  1. Start with a prepared cake.  Follow the directions on a cake mix or make a cake from scratch.  The cake must be cooled to begin.  
  2. Crumble the  cake into a large bowl.  Add 1/2 can of frosting.  Using a spatula mix the frosting into the crumbs until it all begins to clump together.  Add more frosting if necessary.
  3. Using a cookie scoop measure out balls of cake filling.  My cake mix made about 30 balls.  My scoop is by Pampered Chef and measures about 1 1/2 across.  Roll balls, setting them on waxed paper on a cookie sheet.Refrigerate overnight or several hours or place in freezer for an hour.  
  4. Melt chocolate according to directions in electric melter or microwave.  
  5. Using the lollipop stick make a hole in each of the balls.  Dip the end of the stick in the melted chocolate and press it into the cake ball.  Allow to harden before proceeding.  If necessary place back in refrigerator while the candy hardens. 
  6. Carefully dip cake balls into melted chocolate and add decorations while candy is still melted.  Press into Styrofoam to allow to harden.
  7. Once the Cake Pops harden you may wrap them individually in party bags.  
Cake Pops Complete & Individually Wrapped
Add curly ribbons and shredded crinkled paper
Display on Styrofoam squares stacked

Thursday, April 21, 2011

A Painting A Day: Buried Treasures

What summer is complete without a trip to the beach?
My memories are filled with beach stories...finding sand dollars with your feet at low tide, building sand castles along the shoreline, digging for pirates buried treasures, looking for sea shells along the sea shore....
Buried Treasure is a small watercolor (8" x 10")
I think I completed this in record time but then again, it is a really simple painting.  
Tomorrow is a day off for me.  I am looking forward to preparing for family who will be here on Sunday and having more time to paint.  This  painting challenge has been a wonderful experience for me.  It has helped me to feel more satisfied. I have something to show for my day and something to look forward to doing tomorrow.  
 

post signature

A Painting A Day: Papa's Arms

My students are now keeping me honest about getting a painting done a day.  They want to see what I got done each day.  
Papa's Arms (Watercolor 8" x 10")
Today as I was working on this painting that I did not finish yesterday evening because of more important commitments like family one of my students commented to me. 
 "Isn't that the painting you did yesterday?" 
 I have done so many at this point I was even getting confused and yesterday was so busy I had almost forgotten I had not finished what I had worked on for the day but I came to my senses and finally answered.
"Yes, it is.  I went to a performance yesterday evening that my grandchildren were in so I was not home until late and did not have time to finish this."
"So...you are going to do two today?!"
"Aw-w!  Yes!  I am!"
So now I'm doing it!  


post signature

Tuesday, April 19, 2011

A Painting A Day: Exploring

Exploring (Watercolor 7" x 11")

One of my fondest memories as a child was to get to explore the pastures at my grandparents' farm 
or to discover new things when we went to spend a few days at the lake.  
Although many things have changed over the years these three grandchildren of mine are no different. 
Sometimes we take "nature walks" or do a scavenger hunt or just a hike to get out of the house and into the fields.

 This painting, Exploring is again a small watercolor (7" x 11").  I have found this size is a good size for a daily painting challenge, small enough to finish in an evening and yet big enough to create an interesting and fun composition.  The small size has made me focus more on the gesture of the figures rather than the minute details. I started off worrying over every little thing but as the week went by (I am now starting the second week of the challenge) I began to relax and enjoy it. 
Now I am wondering why I have not been doing this
and
when the challenge is over I will continue.  

Find your creative self and enjoy it.
post signature

Monday, April 18, 2011

A Painting A Day: Flamenco Dancers

This is Fiesta time in San Antonio.
Considering the festivities going on I thought it would be a good time to paint
some Flamenco dancers I photographed last spring.


This group was a local one made up of  students from very young to high school age.
While going through the photos in my classroom a few days ago I discovered that one of the dancers I photographed is in my classroom this year.

The painting is a very small painting considering the number of dancers included.
The entire painting is no more than 7" x 9" with my dancers about 3" tall give or take a little.


post signature