Showing posts with label The Holidays. Show all posts

Thursday, November 13, 2014

The Christmas Squirrel Quilt Pattern

It has been two years but finally I have completed the pattern for the Squirrels' Christmas Quilt I made two years ago.

This is the quilt I entered in the Think Christmas Blog Hop in 2012. (click to go the post)

This was my first paper piecing quilt and in fact, my first real quilt! And I had never done any type of paper piecing.

I started the quilt during the time I  had three grandchildren living with me along with their parents while their house was under construction.

Well...construction?  It was 18 months, I think it was in the planning stage,the financing stage, the finding the right people stage and finally the construction stage.

Needless to say space was cramped, it was hard to find a private space for my creative things or even the non-creative things and every time I took out something fun to do the grandchildren wanted to take part in it.  Now, don't misunderstand.  I loved it!  I thrived on it! I just didn't get much done.

But that is all fine.  It was bonding times. The children and I grew together during our "projects" time.

When the kids and their parents went on vacation for a few days I was left alone...well, almost...my daughter came with her children to spend the weekend and when we finally had time to sit down and read the direction together a storm moved in, a flash a lightning lit up the sky with a booming noise and the lights were out...for hours.

Then my old machine gave out on me and I was forced to buy a new one!  Poor me!  I got the best machine I could afford.  

Now not only was I learning how to paper piece I was learning how to use a new machine...my first computerized machine.  My last machine was a Viking from about "79.  It lasted a good long time!

Next Squirrels' Christmas Pillows!
I wonder if I will get it done before two years pass.

The Squirrel's Christmas Quilt Pattern can be found either my Etsy site or my Craftsy site.
post signature


Saturday, December 15, 2012

Fire up those Sharpies!

Something next to magical happens when a Sharpie is placed in someone's hands. 
The lines are clean and crisp and one design just leads into the next. 
I love working with Sharpies!

My kitchen now looks like a manufacturing kitchen....dishes everywhere but no food in sight!

So here's the scoop......I bought out the white china dishes at Dollar Tree. I bought several shapes and sizes of glazed white china.

The magic of a Dollar store find and a Sharpie!


I bought coffee mugs...coffee mugs that were tall and narrow, coffee mugs that were short and fat, coffee mugs with slightly fluted designs, and coffee mugs with little raised dots!

I bought plates...round plates, square plates, dinner plates and snack size plates! I even bought some red plates to play around with.
(Poor checker who got me, right? Took forever wrapping those glass dishes in paper to get me out of the store.)       

I stocked up on new Fine tipped Sharpies (the original Sharpies, not ultra-fine), made sure I had some alcohol...the kind that goes in the medicine cabinet and a few little q-tips for my many mistakes!

 Next I settled in for a  good old movie I could enjoy while listening because my attention is going to be on drawing the dish in my lap.

I started looking at those dishes and waited and waited and looked and looked even turned it in my hands as if that would matter!  And I waited for inspiration to strike me in the head like lightening....oh, but it doesn't work that way, does it?
So I took a deep breathe and got up the courage to put down the first mark!

DONE!
So there it is...the first mark! 
YIKES!
THAT WILL NEVER DO!
  Just gently wipe that stray mark away like a stray tear that slips out of the corner of an eye. 

Use a dab of  alcohol on a q-tip and wipe.  It will turn purple but wipe it again until it is comes clean using the other end of the q-tip.
I tried prepacked wet wipes for eye glasses not the wipes for  little bottoms. They work also, but I
had to keep the q-tips handy because I was using up all my wet wipes. 

I make many, many mistakes. 

Since I have the best job in the world...teaching art, I took all that glassware to school and let my students experiment on glass. 

Yesterday one of my students came by after school to show me her finished mug and get final instructions on firing the glass...in your own oven, by the way!
(And I call it firing not baking because we are talking ceramics here not cakes.)
Before she left she admitted to me,
 "I'm addicted to it now! It's so much fun."
Well, welcome to my world!!!!

Sing it Madonna....(oops!  Cyndie
, thanks Lisa!)
Girls just want to have fun-un!
Yes, girls just want to have fun!
So here are the simple, simple instructions:

Draw & Fire!
  • Place the glassware in a cold oven, set the temperature to 400-450 degrees
  • Begin your timing when the oven gets to the desired temp. 
    •  (Color markers lose their color in the hottest temps but red comes out red at 400 degrees in my oven.  Most colors faded but especially the cool colors:blue, green and purple.  Yellow turned brownish.) 
  • Fire about 40 minutes,  
  • Turn the oven off and leave the glassware to cool in the oven.  Cooling takes hours but you don't want to rush it because cooling too fast causes cracks and ruptures to form or even breaking. 
Most importantly, treasure your creative time!

UPDATE  UPDATE UPDATE!

Please, read!
Since I wrote this article back in December 2012 I have continued to experiment and have found a better method of drawing on porcelain which is dishwasher safe.

Any Color, Food Safe & Dishwasher Safe!
Using a product called Porcelaine paint which can be purchased online (I got mine through Amazon) and used small applicator bottles  to draw.(also, purchased through Amazon)

I drew as usual with my Sharpie.
Then traced my drawing with the small tip of applicator bottle in whatever color I wanted.
Allowed to dry 24 hrs then fired in my own oven at 300 degrees (150C) for 35 minutes.
The paint is more dimensional so it is slightly raised but I think that adds to the charm.
As I write this I am putting a much used dish in the dishwasher with not even a slight concern as to whether or not it will come out as I put it in.  It will!

So keep drawing with those Sharpies but make your dishes dishwasher safe with Porcelaine paint plus add colors.  Colors come out fairly true!

And thanks, Lisa for correcting my two year old mistake. Cyndi Lauper not Madonna sang "Girls Just Want to Have Fun."

Another design but made for the kids at Making Fun Making Faces 
post signature


Friday, November 30, 2012

A Family Tradition: Christmas Ornaments


I can not remember a Christmas without making my own ornaments.  Linda and I used newspapers, egg cartons, toilet paper tubes or whatever else we can get our hands on.  We were green before green was green!

Although, I am not sure we could call ourselves truly green since we glittered things to pieces!  
The papers available now are just too much fun to not use. So go green if you wish but for this project make sure your paper is thick enough like card stock.   In the past we may have used pages out of old wallpaper books we collected from venders when the papers were discontinued.  I had a closet full of wallpaper books. My children were free to use them when they were being creative.

But I have to be honest. This is not one of my green projects.  I am using scrapbook paper for this project.

The HOW-TO:


The basic design is an origami bell that I learned from my big sister Linda who learned it from her teacher in school so many years ago.  I have no idea how old we were but she had to help me make mine in the early years.

Now as an art teacher I have my students do this project every year in my high school art classes.  The project has been popular with my students for years. 


Start with a perfect square of any size.
For every fold reopen the paper.
Ready?  Here goes...

The easy way to remember the steps is to remember hot dog, hot dog, taco, taco, kite, kite, kite, kite!
These are not technical terms but my students understand them and I can hear them say it while they work.
"Hot dog, hot dog, taco, taco, kite, kite, kite, kite.."

    Hot Dog Fold
  • Hot Dog (Fold the paper in half creating a rectangle thus the hot dog bun.)
    • Open fold
    • Hot Dog (same as above)
    • Open fold.

    Taco Fold Upside Down
    • Taco (Fold the half from point to point making a big triangle...aw-w, that taco went upside down!)
    • Open fold.
    • Taco (same as above)
    • Open Fold


    • Turn paper over and work from the backside. 
    • Kite (Turn the paper to make a diamond shape.  Place a finger on the top corner to anchor in place.   With the other hand pull up one of the side corners and fold to the center of the paper, lining up the edge of the paper to the center fold.  Repeat on the opposite side to make a kite shape.  
    • Open folds.
    • Kite (Repeat folds as above on next corner)
    • Open folds
    • Kite (Repeat folds as above on next corner)
    • Open folds
    • Kite (Repeat folds as above.)
    • Open folds.
Octagon shape in the middle
If all folds have been made you will see an octagon shape in the middle.
Gentle pressure on the sides
Gentle press inward on the middle of each side so the sides begin to push inward.  At the same time as you begin to push upward with the four sides, press in the middle to make the middle of the bottom push outward.

Gentle shape the bottom of the bell, creating hills and valleys along the folds. 
Hot glue along point where all four sides come together.


 Okay, now go a step beyond and start some ornamentation to make it distinctly yours.
  • I hot glued rosettes to mine by cutting a circle then cutting it into a spiral.  I used various size circles. 
  •  Use a toothpick and start with the outside edge swirling it around the toothpick. Hot glue in place using the center of the swirl as a base.  
  • Cascade the rosettes downward and add leaves.  
  • For the leaves cut out a leaf shape, fold it down the middle for a central vein, then fold the reverse direction toward the top end of the leaf on each side to push the leaf downward.  
  • Add curly ribbons and you are finished.  

Gorgeous!!


post signature


Thursday, November 29, 2012

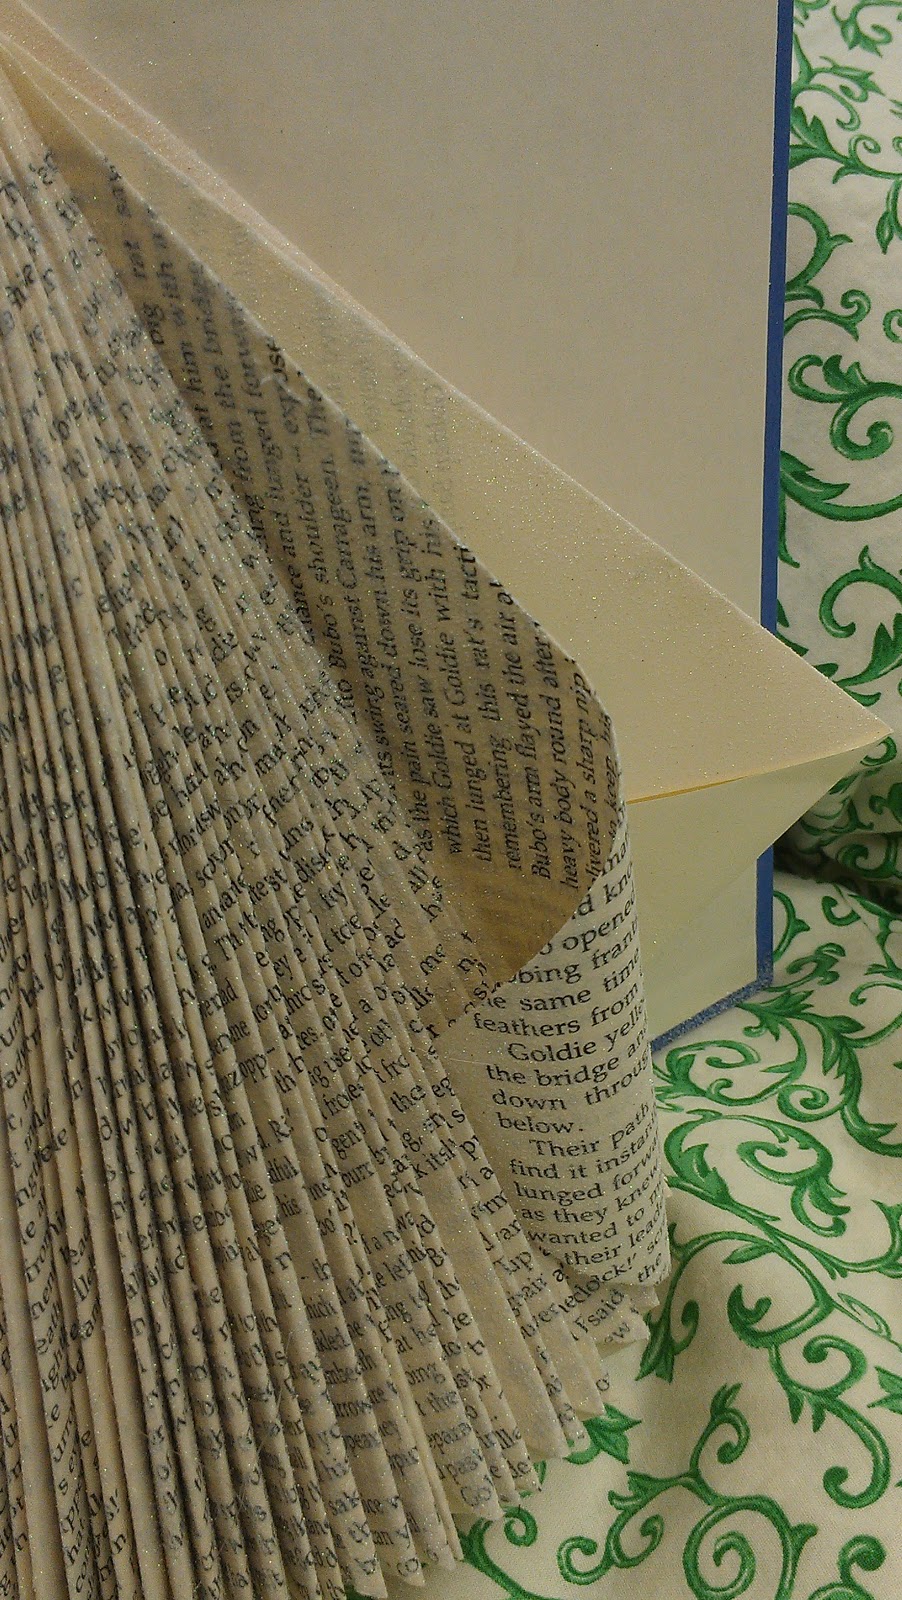
New life for an old book


Oh, it is nearly Christmas again and that means Christmas projects!  Linda and I always spent our evenings after school and weekends making ornaments and doing projects related to Christmas.  I still think the best projects happen in December and the time leading up to Christmas.

One of my fond memories is making an angel in the garage out of my dad's old Popular Mechanics magazines.  After all, what good were they? They were just filled with not so pretty pictures and had lots and lots of writing.  He had stacks of them in the garage so Linda and I just helped ourselves to his magazines and started folding.

When we brought out the beautiful angel Daddy did ask what magazines we used and he did have a strange look on his face when we told but I never heard any complaint!

I guess, we were really cute back then!  I wonder if I could get away with that today?

This week I requested magazines from our school librarian for my art classes. She supplied me the magazines as requested and threw in some old books as well.   As soon as they fell into my hands the old folding memories resurfaced.  I had kids folding pages in minutes.  As I folded I let the book tell me what it wanted to be.  This book wanted to be an angel but we had many various Christmas trees using the same concept.  

The How-to:

(I started with an old book with yellowed pages and thicker paper with 200 pages.)

The Folded Page:

  • Each individual page has three folds: 
    • 1st: Top right corner to inside seam.   
    • 2nd fold: Folded edge of page to inside seam. 
    • 3rd.  Turn up triangle that hangs off the bottom.   
  • Next page: same as above until all pages are folded.

Sleeves and Wings:

  • Pull out pages where you think the arms should be.
  • Unfold page leaving only the first fold.
  •  Tuck tip of page into one of the pages in front of it to create a curved sleeve.several pages in front of it.
  • The hard cover and the fly page folded in serve as wings.

Head...Still re-purposing!

  • Wad up a plastic grocery bag into a ball  and place into another bag making it as round and smooth as you can.  
  • Cut a large circle out of an old white tee-shirt and cover the plastic ball with it stretching it tightly.
  • Hold fabric with a rubber band.  
  • Tape around rubber band and a little of the bag below the rubber band.   
  • Insert taped end into the gap made by the book binding.   

Scarf....oh, so easy and so cute!  

  • Sandwich a 6-8" square of that old tee-shirt fabric between two pieces of paper.  
  • Draw a circle about 4-6" or improvise and wing it and just cut the circle cutting through both papers and fabric. 
  •  Continue cutting in a spiral folding the edge of the circle about 1/2"-3/4" away from previously cut edge until you come to the middle.  Cut a tiny circle out of the middle and discard.  
  • Take an end in each hand and stretch fabric.  
  • It will twist and spiral downward.  
  • Wrap around neck letting spirals of scarf cascade downward.  Hot glue in place. 

Spray Glitter:  NOT re-purposing but oh, so nice!

I purchased spray glitter in the craft section of Walmart.  I used silver Glitter Blast.
Spray the entire angel including head and scarf.

Add halo using a length of wired ribbon about 6-8" long depending on head size.

I'm having so much fun!  
Can't wait until tomorrow so I can do more fun stuff!


post signature


Sunday, December 14, 2008

Here Comes Santa Claus

I received an email from my dad the other day sending me a cake in a cup recipe. I quickly opened it and scanned it without much thought and sent back an email saying, "okay, we will have a chocolate cake in a cup when I come for coffee this evening." Then I quickly forgot it in the midst of all my busy work at school. I forgot about it that evening at coffee but I did remember it the next evening. When I mentioned making the cake in a cup he was happy to see I remembered it.

It was not the greatest cake I ever ate but it was good and it was chocolate and it was done in three minutes flat and gone in the next few minutes. It was fun. It filled the cup so much that it was a pretty big piece of cake for me so we divided it between us and shared it.


The following is the recipe:

5 MINUTE CHOCOLATE MUG CAKE
4 tablespoons flour
4 tablespoons sugar
2 tablespoons cocoa
1 egg
3 tablespoons milk
3 tablespoons oil
3 tablespoons chocolate chips (optional)
A small splash of vanilla extract
1 large coffee mug
Add dry ingredients to mug, and mix well. Add the egg and mix thoroughly.
Pour in the milk and oil and mix well.
Add the chocolate chips (if using) and vanilla extract, and mix again.
Put your mug in the microwave and cook for 3 minutes.
I made it again today because I am alone for the afternoon and chocolate is a favorite. Indeed I had chocolate cake in three minutes and that is how long it took me to clean up my mess after I dropped the cocoa can, dribbled milk on the counter and spilled little bits of sugar and flour. But how fun was that. It was almost like I am sneaking cake for myself because once I clean it up no one will be the wiser. Except when the scales start squealing.

So now this got me to thinking. With Christmas coming I think the grandchildren would love to make their own cakes but knowing the mess I made with it I had to find something easier for them. Here is what I have found.
Everywhere I looked online they used them as teacher gifts. Great idea! One person put the mug together and then added truffles and coffee in a basket she shrink wrapped.
(To give credit where credit is due I found this on www.reallifeblog.net)

Cake in a Cup (makes 8)

18 ¼ oz. Chocolate Cake Mix (box, any brand)
3.9 oz. pkg. Instant chocolate pudding mix
3 c. powdered sugar, divided
4 ½ T. hot cocoa mix, divided
2 ¼ t. vanilla powder, divided (This is the only expensive ingredient, and can be left out if needed.)

Place dry cake mix and pudding mix in a large mixing bowl; mix together. Divide and place a ½ cup mix in 8 plastic sandwich bags; secure with twist ties and label as cake mix. Tuck one bag in a large mug that will hold at least 1 ½ cups of water. Because the cake is microwaved, be sure the cup doesn’t have any metal decorations on it. Place 1/3 cup powdered sugar, 1 ½ teaspoons hot cocoa mix and ¼ teaspoon vanilla powder in 8 plastic sandwich bags; secure with twist ties and label as glaze mix. Makes 8 individual mixes for coffee mugs.

Gift Tag (Tie onto the handle with raffia or ribbon)

Generously spray inside of coffee mug with nonstick vegetable spray. Empty contents of cake mix bag into mug and add one egg white, 1 Tablespoon oil and 1 Tablespoon water. Mix until well blended. Microwave on high for two minutes. While cake is baking place glaze mix in small mixing bowl and add 1 ½ teaspoons water, mix well. When cake is done, pour glaze over cake in cup and enjoy while warm

Fun idea!!!

Anyone else have any fun ideas for Christmas gifts or just fun things to do?

Saturday, January 5, 2008

Saturday, December 22, 2007

Gone Shopping

Went shopping last night.....

Went shopping this morning......

Not finished still.

I remember back when I loved shopping for Christmas presents. That is when it was easier and there was not so much stuff to buy. I want to have the generous spirit back but the pressing time and the pressing crowds are just overwhelming to me instead. I want to get something for each person that will make them smile and yell "Yipee" but only the kids do that now and they can do that over a nerf ball pop gun.

So I have taken inventory and these are the things I have learned about keeping my sanity and enjoying family during one of the most hectic times of the year:
  • Chinette instead of china
  • Plastic instead of sterling
  • Stack the dishwasher as you go
  • Bottled water with individual flavoring packets, and individual hot chocolate mix envelopes on the shelf in a kid friendly spot
  • A 1000 piece puzzle started in a convenient spot
  • Colors, pencils, markers and lots of lots of paper
  • Get down on the floor at the kid level as often as you can

But most importantly no one's happiness is dependent on my gift to them or the amount of money I throw at them and that the love you feel the whole year through is evident in how you speak to them and how you treat them every day of the year.

Enjoy your time with family or whoever is sharing the time with you, smile and laugh and get on the floor a little.

Much love to all.